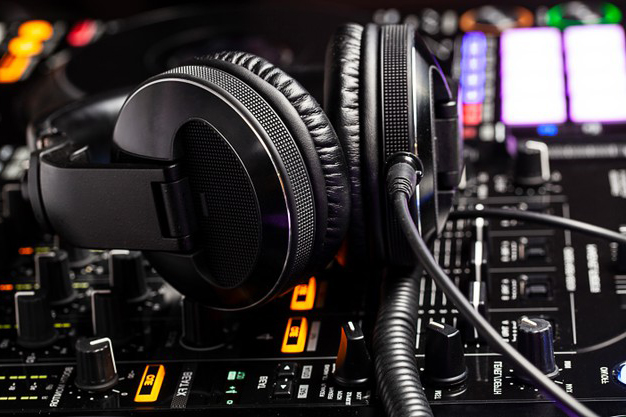


![Top DJ software for Live Performances and Gigs [2023]](/assets/images/e3802ce366623687d91ac7df2186a9ea.png)
![Top DJ Software and Music Streaming Alternatives to Spotify [2023]](/assets/images/fc2e59c678a10fda46c5367c3f077ed4.png)


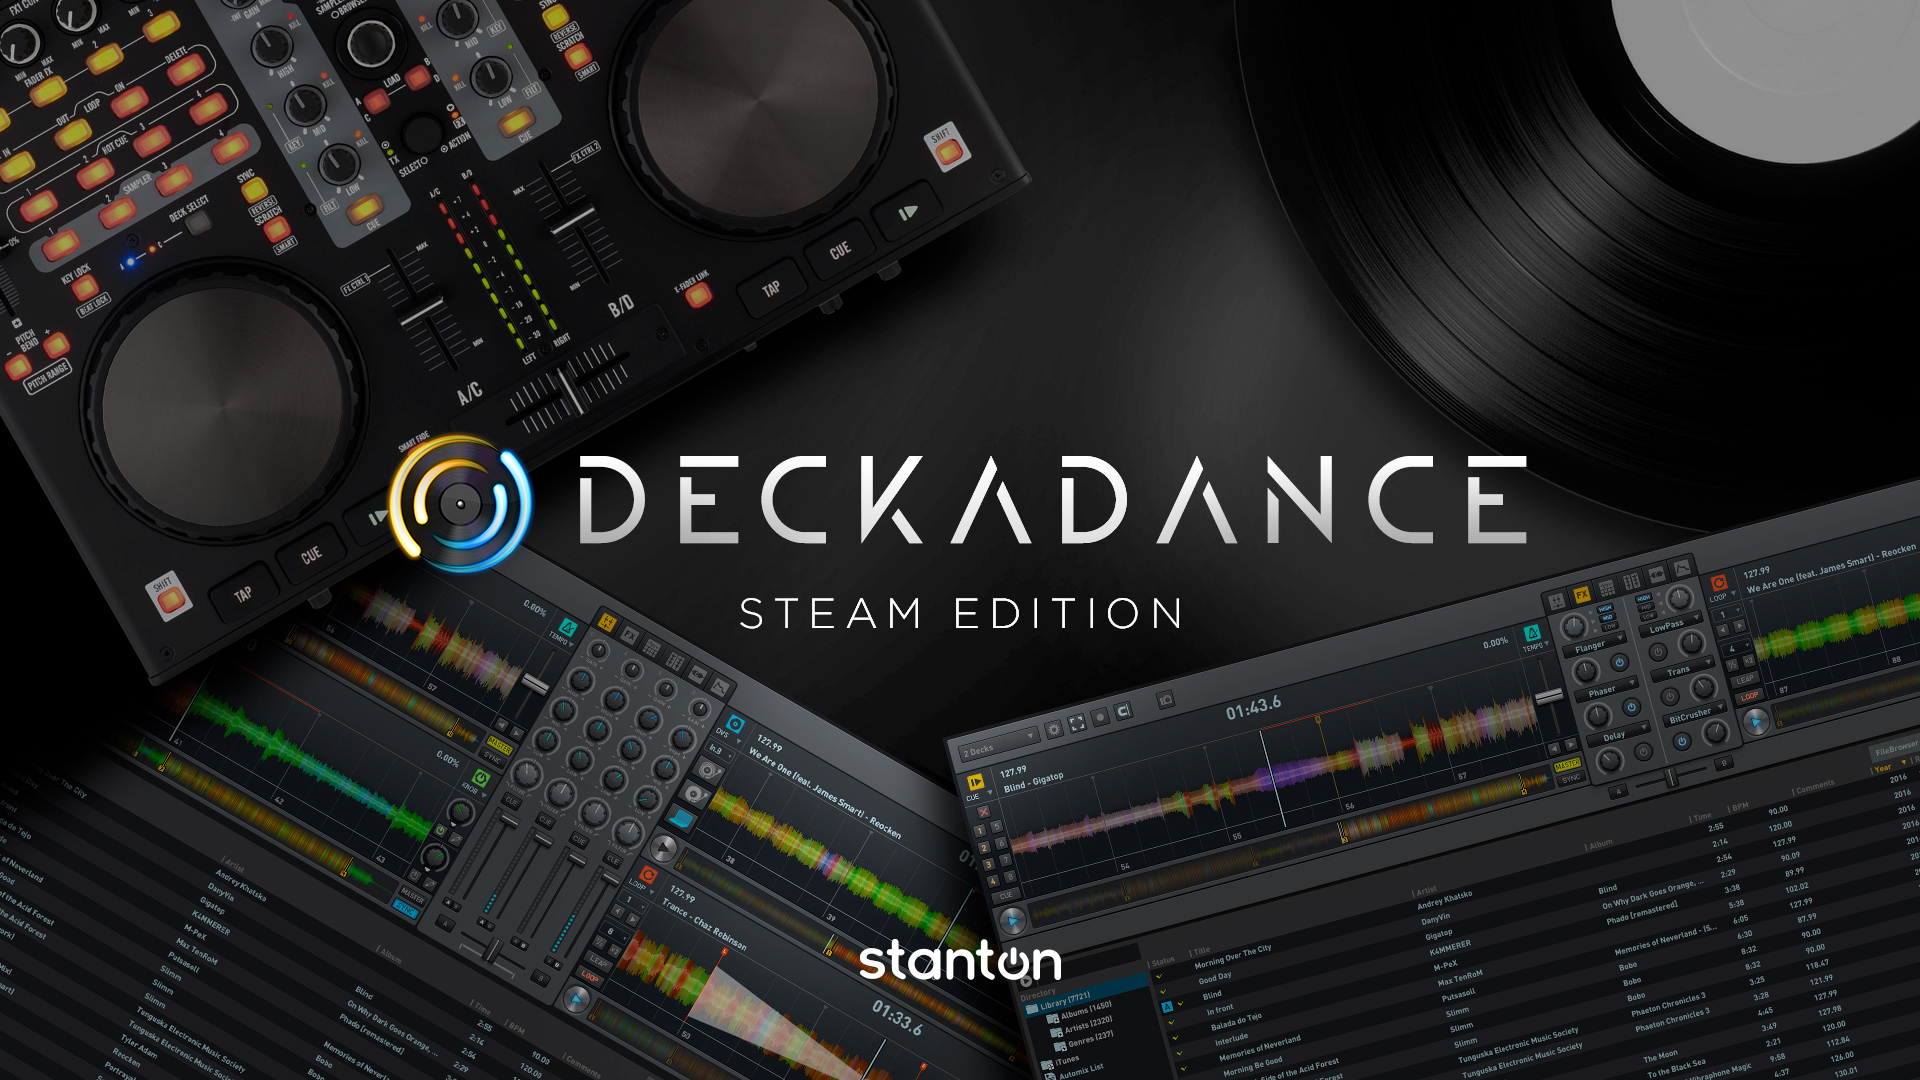
Deckadance is a software for DJs whose first version came in 2007 from Image Line, a popular company for creating Fruity Loops, a popular and complete professional music creation software mainly oriented to electronic music that in its beginnings was little more than a drum machine software. Deckadance was mainly developed by Arguru, a Spanish developer who sadly passed away in 2007 shortly after the launch of Deckadance.
The evolution of the software continued thanks to the work of the Image Line team of developers who collaborated with Arguru initially. Almost 2 years after its last official version, 1.9, a beta version of the next evolution of Deckadance has finally been made public. The new version 2.0 is really surprising since it does not limit itself to providing functions and views in other popular programs for professional DJs to try to be up to it, this version brings features so far never seen in other programs and that will provide you with a status own within the sector. We downloaded and tested the beta version, and this is what we found.

Interface
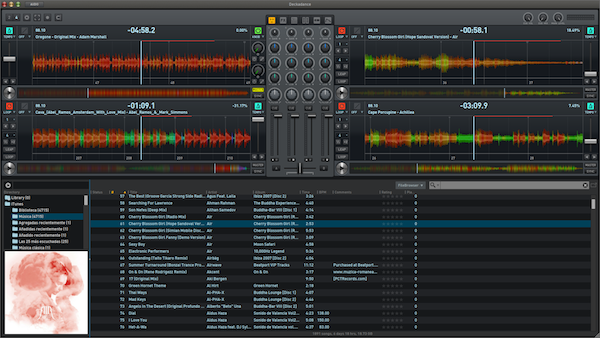
The interface appears to have been redesigned from scratch. In the central part we will have an area where we will have different control panels according to our needs, these panels can alternate between the mixer (with a real mixer look, not like before), effects, sampler, vertical viewer of the forms waveform, VST effects and the grossbeat. Around this central part we will have 2 or 4 decks (as we like), and underneath a wide and spartan browser. On the sides of each deck we also have control panels that change according to needs, or if we prefer, we can simultaneously show several control panels to the detriment of the amount of waveform that we can visualize. We will have control panels for loop, cue, dvs, tone, tempo and smartknob.
New shades of flatter gray colors, simpler and less cluttered controls, some reminiscences of Traktor, although certainly a better aspect compared to the previous version. The colors of the waveforms appear similar, although they are drawn in greater detail
Effects by frequencies
Deckadance 2 allows you to insert 3 different effects on each deck of the 10 that the software has incorporated. Although you can barely control the level of dry / wet and one parameter per effect (some DJs love this simplicity in FX, others hate it), we have a novelty in DJ software, and that is the possibility of applying the effects only at a range of frequencies. The spectrum will be divided into 3 ranges (high, mid and low) and by default the FX will be applied in all, although we can deselect what we want and for example apply a reverb only to the treble. It is a pity that this selection applies to all 3 effects on each deck and that an individual range selection cannot be made for each effect. And by the way, since finally a software brings the application of effects by frequencies … when will we have the mixing by frequencies in the style of the DJM-2000? I hope we don’t take long to see it.
Complete mixer
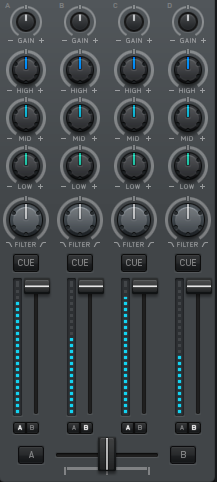
In previous versions the elements of the virtual mixer were distributed throughout the interface, now we will have the mixer in the center and with a total mixer appearance. 4 full mixing channels, with fader, level meter, 3-band EQ, gain and DJM-style filter. All channels are assignable to one side or the other of the crossfader. The level meters emulate the segment level meters of hardware consoles and have a good response.
Not everything is good, there are some flaws. The sampler still does not have its own channel in the mixer, the level meters do not have any numerical indicator of the level at which they are sounding, there is only one last segment in the level meters that turns orange indicating saturation, the level meter of the “main level” as well as the knob that controls this parameter are set aside in the upper right corner.
Sampler
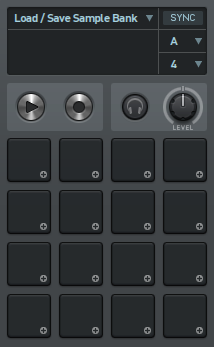
The sampler has been totally revamped, its interface and some of its functions have been greatly simplified, although at the same time its capacity has been doubled and it can now trigger 16 samples. Now there are no individual volume controls for each sample or capture controls for each sample trigger, there is a single output volume control for the entire sampler (DJ Intro style), and a single set of sample capture controls . The loops are shown to us in a grid of 4x4 pads that trigger the samples (novelty), in each pad we can see the duration of the sample written, where it comes from and the original BPM of the sample. The sampler can be synced to the tempo of any of the 4 decks. The sample banks that we create can be saved, but the generated file is only an .xml with information on the location of the samples used in the bank and information related to the samples, it is not possible to create packages that contain all the samples in the bank so they can be easily shared or transported from a studio computer to a live laptop. You can’t apply effects to the sampler, too bad.
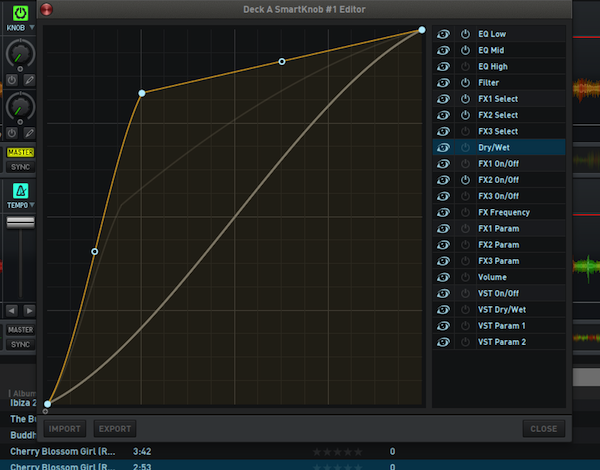
Smartknob
This new function allows you to simultaneously control various software functions such as EQ, Filter, FX and FX VST with a single knob. In each deck we will have two smartknob and to each one of the smartknob we can apply the functions we want and program the independent application curve of each of these functions. For example, we can program a smartknob so that when turning it, it progressively applies the filter only in high-pass and at the same time reverb and delay, and that the delay is proportionally double that of reverb. If we add the VST effects to this, we can cause heart attacks.
Here Image-Line has overtaken Native Instruments on the right, since the latter included in Traktor the MacroFX function that was announced as controlling several effects at the same time, only that the effects were already programmed by NI. Image Line gives the user total freedom allowing him to combine effects and much more to his liking.
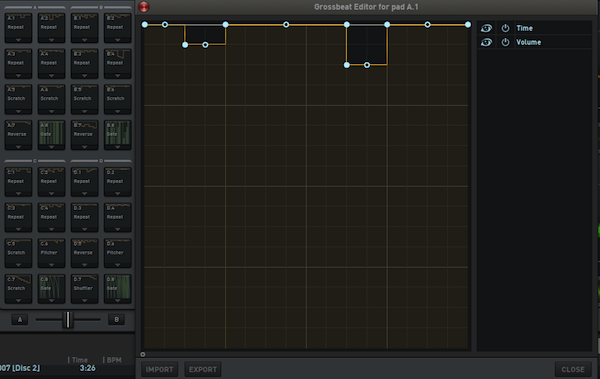
Grossbeat
Grossbeat is an improvement on the Relooper already included in previous versions of Deckadance. By means of something similar to a step sequencer Relooper allowed to play rhythmically with fragments of the measure while playing a song, it was possible to have 3 patterns for each deck. Grossbeat goes further as it allows that and much more, already through a graphical editor based on lines and curves you can program scratches, simulate vinyl stops, reverse reproductions … and everything in a rhythmic way. Grossbeat comes with plenty of patterns of all kinds already programmed, and you can have up to 8 ready-to-shoot patterns loaded on each deck.
It’s not exactly easy to program at first, and accomplishing many functions will be a matter of trial and error and looking at how the examples have been programmed. But the effort may be worth it just to take advantage of one of the most original functions that have been seen so far in a DJ software.
Conclusions
Some of the new features like Grossbeat or Smartknob are a breath of fresh air. In recent years, the developers of the most popular programs have only tried to copy each other certain functions and then try to refine them or give them a little touch of personality. Finding two new features like this is encouraging and shows that you can still invent things in the field of DJ software, plus it’s great that it’s not one of the greats who brings the inventions. It seems that full control over effects and “tricks” will be one of the hallmarks of the new Deckadance, so welcome is this touch of personality. In a way, the great Deckadance evolution is reminiscent of the evolution of Fruityloops, which has gone from being something very simple to something tremendously complex over the years, so you will never have to take your eyes off everything that Image Line develops, already that as simple as it may seem, it can become something very big.
Regarding the competitiveness of Deckadance 2 in the market, it will be necessary to see the final price with which it will go on sale when it ceases to be beta, it will also be necessary to see if it continues to be sold in two versions as before, with and without timecode (Club and House Edition), with two different prices or it is sold as the only version. At the moment there is only a full-featured beta without nicknames. And by the way, since I have named the timecode, note that apparently Image Line is going to continue without releasing its own vinyls, so that it will still be necessary to use vinyls from other developers such as Miss Pinky or PCDJ Reflex, they can also continue to be used the CDs with timecode generated by the program itself.
And do not hesitate for a second that we will help you with tutorials so that you get the most out of Deckadance 2
Deckdance 2.7 Tutorial and Configuration
Deckadance version 2 is such a complete and radical revamp of this software that it could almost be considered a new program. It is clear that both new and experienced DJs are going to pay a lot of attention to Deckadance 2, so from now on we are going to offer you several tutorials based on this program that cover your learning needs.
In this first tutorial we are going to focus on how to configure Deckadance 2 to adapt it to our hardware and our needs. Arguably a simple entry-level tutorial for first-time players of the show.
Setting up the hardware
In the upper left corner is the gear icon that opens the Preferences window. The first thing we must configure is the hardware that we will use with Deckadance 2, so we click on the Audio Setup tab. In “Audio Device Type” if we are on Windows the logical thing will be that we choose ASIO, even if we do not have an ASIO audio device, during the Deckadance installation ASIO4All is installed, so that the internal audio device of the computer will appear as an ASIO device. In “Device” we choose the specific device. If we click on “Show Advanced Settings” we can choose the sample rate and latency. By clicking on “Show this device control panel” we can see the control panel of the audio device, this panel will be different in each device and does not depend on Deckadance, some audio devices require changing the latency or sample rate from this type of panel to be able to change them also in the application.
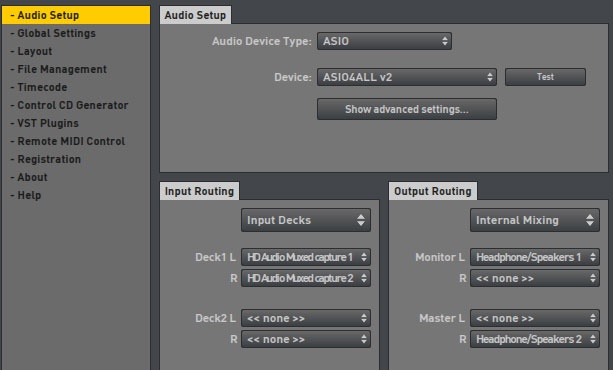
Below we have “Input Routing” and “Output Routing”. “Input Routing” will be interesting to configure if we are using the “DVS Edition” and we intend to use the control by timecode vinyls, in this case we must select “Input Decks” and the necessary drop-down menus will appear to choose the inputs in which we will connect the dishes. Enough dropdowns will always appear to choose inputs for the 4 decks, even if the device we have selected in “Device”. In “Output Routing” we will first choose between “Internal Mixing” or “External Mixer”, the first option is the logic if we are working with a MIDI controller that acts as a mixer, the second is for whether we are going to route the audio of each deck to an external mixer and we mix there. If we do the mix internally, only dropdowns will appear to choose the audio outputs to monitor and for master output, in the external mix we will have dropdowns to choose the audio outputs of each deck
More options
In the “Global Settings” tab of the “Preferences” window we have many more interesting configuration options. The “Disable elastique master and key lock engine” option is used to disable key lock when changing the playback speed, which is generally referred to as “master tempo” or “keylock” in other programs or on digital players. Disabling it can lighten the CPU load on older computers a bit, and will also make the tonality utility panel totally unusable. “Lock playing deck” will prevent you from mistakenly loading songs on decks that are currently playing, thus avoiding disastrous silence. “Show spectral color waveform” will make that instead of showing the waveform in multiple colors it is only shown in light blue. “Slow decoder / analysis mode” will use a way to decode and analyze music files that will overload the CPU less, but will take longer to load the tracks and do their analysis (waveform, BPM, etc …)
“BPM detector minumum threshold” establishes the minimum BPM’s that it will detect in the music analysis. It is very useful if all the music we will have in Deckadance is of the same genre and similar tempo, and it will avoid tempo detections of half the real speed, something that happens sometimes when the analysis confuses the bass line with the percussion . Tempo range sets the pitch range of the virtual decks. If we use time code control, the logical thing is that we set it to the same range as the external control device that we use. The options “Enable crossfader reverse” and “Enable crossfader curve” are the most interesting for turntablists, the first one makes the audio go backwards than the position of the crossfader, while the second one allows to regulate the mixing curve of the crossfader. The numerical value of 0 on the crossfader curve is for the typical scratch cut, the value 50 gives mix in the center with maximum volume values and the value 100 gives the maximum volumes at the extremes.
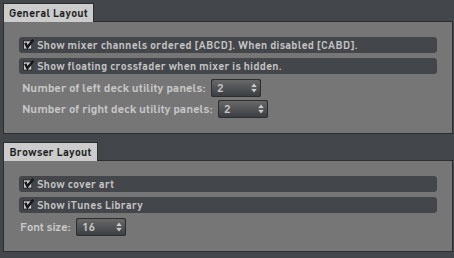
In the “Layout” tab we have several important options. “Show floating crossfader when mixer is hidden” will make sure that even though we are not viewing the mixer in the central panel, we will always have the crossfader visible. Just below we have two drop-down menus to choose the number of “utility panels” on each side of the decks. These “utility panels” are spaces where we can place the loop, cue, DVS, smartknobs, tone, and control controls to our liking and convenience. grid, tempo … We can have up to 4 panels on each side of each deck, but keep in mind that this will reduce the space to display the waveform. Above each of these panels, there is an arrow that when clicking on it will appear a drop-down to choose the controls we want in that panel, there are also options to change the number of panels in that drop-down menu in case you don’t want to go to the preferences to do so. Each deck can be different in terms of the selected utility panels.
“Show cover art” will show the music covers at the bottom left, if they have one, and “Show iTunes library” will show the iTunes library to be able to navigate it in the browser. Although the themes that we load from iTunes do not appear as added to the general library, the analysis of the themes will be saved for the next times we load them, it is as if the iTunes library were part of the Deckadance library.
In Deckadance we have a selector at the top left to choose between 2 and 4 decks. If we have 4 decks and we select to go to 2, decks C and D are simply hidden, so if we had music loaded or some specific configuration on the deck, it will still be there if we select 4 decks again
Folders
The “File Management” tab of the preferences is where the folders in which Deckadance saves or from where it loads certain functions are detailed. The only things you should worry about more are the folder where the iTunes library is in case you use it and in iTunes you have changed the default location, especially if you use an external drive for music. In such a case, check that “iTunes Library File” shows the correct path to the .xml file with the iTunes library. Disk Recorder File is where Deckadance will save your sessions, if you don’t like the default path, change it.
In the “VST Plugins” tab you must indicate where your VST plugins are stored so that Deckadance can use them. Click on “Scan & Verify” and select the folder in the pop-up window, Deckadance will search for the plugins. In that same window you can choose that the plugins loaded in any of the 4 banks for VST effects are applied to the Master output of the audio.
DVS
In the tab “Timecode” you have the options for control by timecode. The tab is divided into four parts, one for each timecode signal. The “Gain” control allows you to increase the gain with which the signal enters, however if the signal enters your audio device too weak because you don’t have a previous phono, don’t expect it to work miracles. The “Rumble” control is a noise reducer to improve signal quality. When choosing a type of vinyl / cd you have a drop-down to choose the Deckadance CD, Ms. Pinky vinyl, Torq (they are the same as Ms. Pinky), PCDJ Reflex or a “generic” one. The generic one is any other time code vinyl, Deckadance can use it using the “Learn” function that is activated with the attached button, when using that learning function of the time code of another vinyl, the pitch of the turntable must be at 0 %.
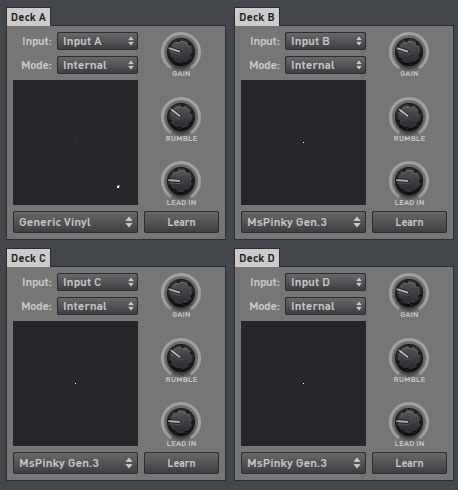
You can use any timecode signal with any deck. In the DVS “utility panel” you can choose the signal you want for that deck (InA, InB, etc.) so you can even control several decks with the same signal and experiment with scratching several tracks at the same time. If “Internal” is selected in the “utility panel”, the timecode signal no longer controls the deck, “Relative” controls only forward or reverse, and “Absolute” controls forward, reverse and position in the song.
I hope these simple explanations have helped you to configure Deckadance 2.
The responses below are not provided, commissioned, reviewed, approved, or otherwise endorsed by any financial entity or advertiser. It is not the advertiser’s responsibility to ensure all posts and/or questions are answered.